How to Freeze Bone Broth


For those lucky enough to have plenty of freezer space, freezing bone broth in ice cube trays is a great method of long-term storage. To say my freezer space is limited is a gross understatement…too narrow and too crowded to successfully accommodate ice cube trays. It took me quite a bit of rearranging to get enough free space for a handful of mason jars. So, for those of you with a similar problem, here’s how to safely freeze your bone broth. This method also works for soups and sauces.
 
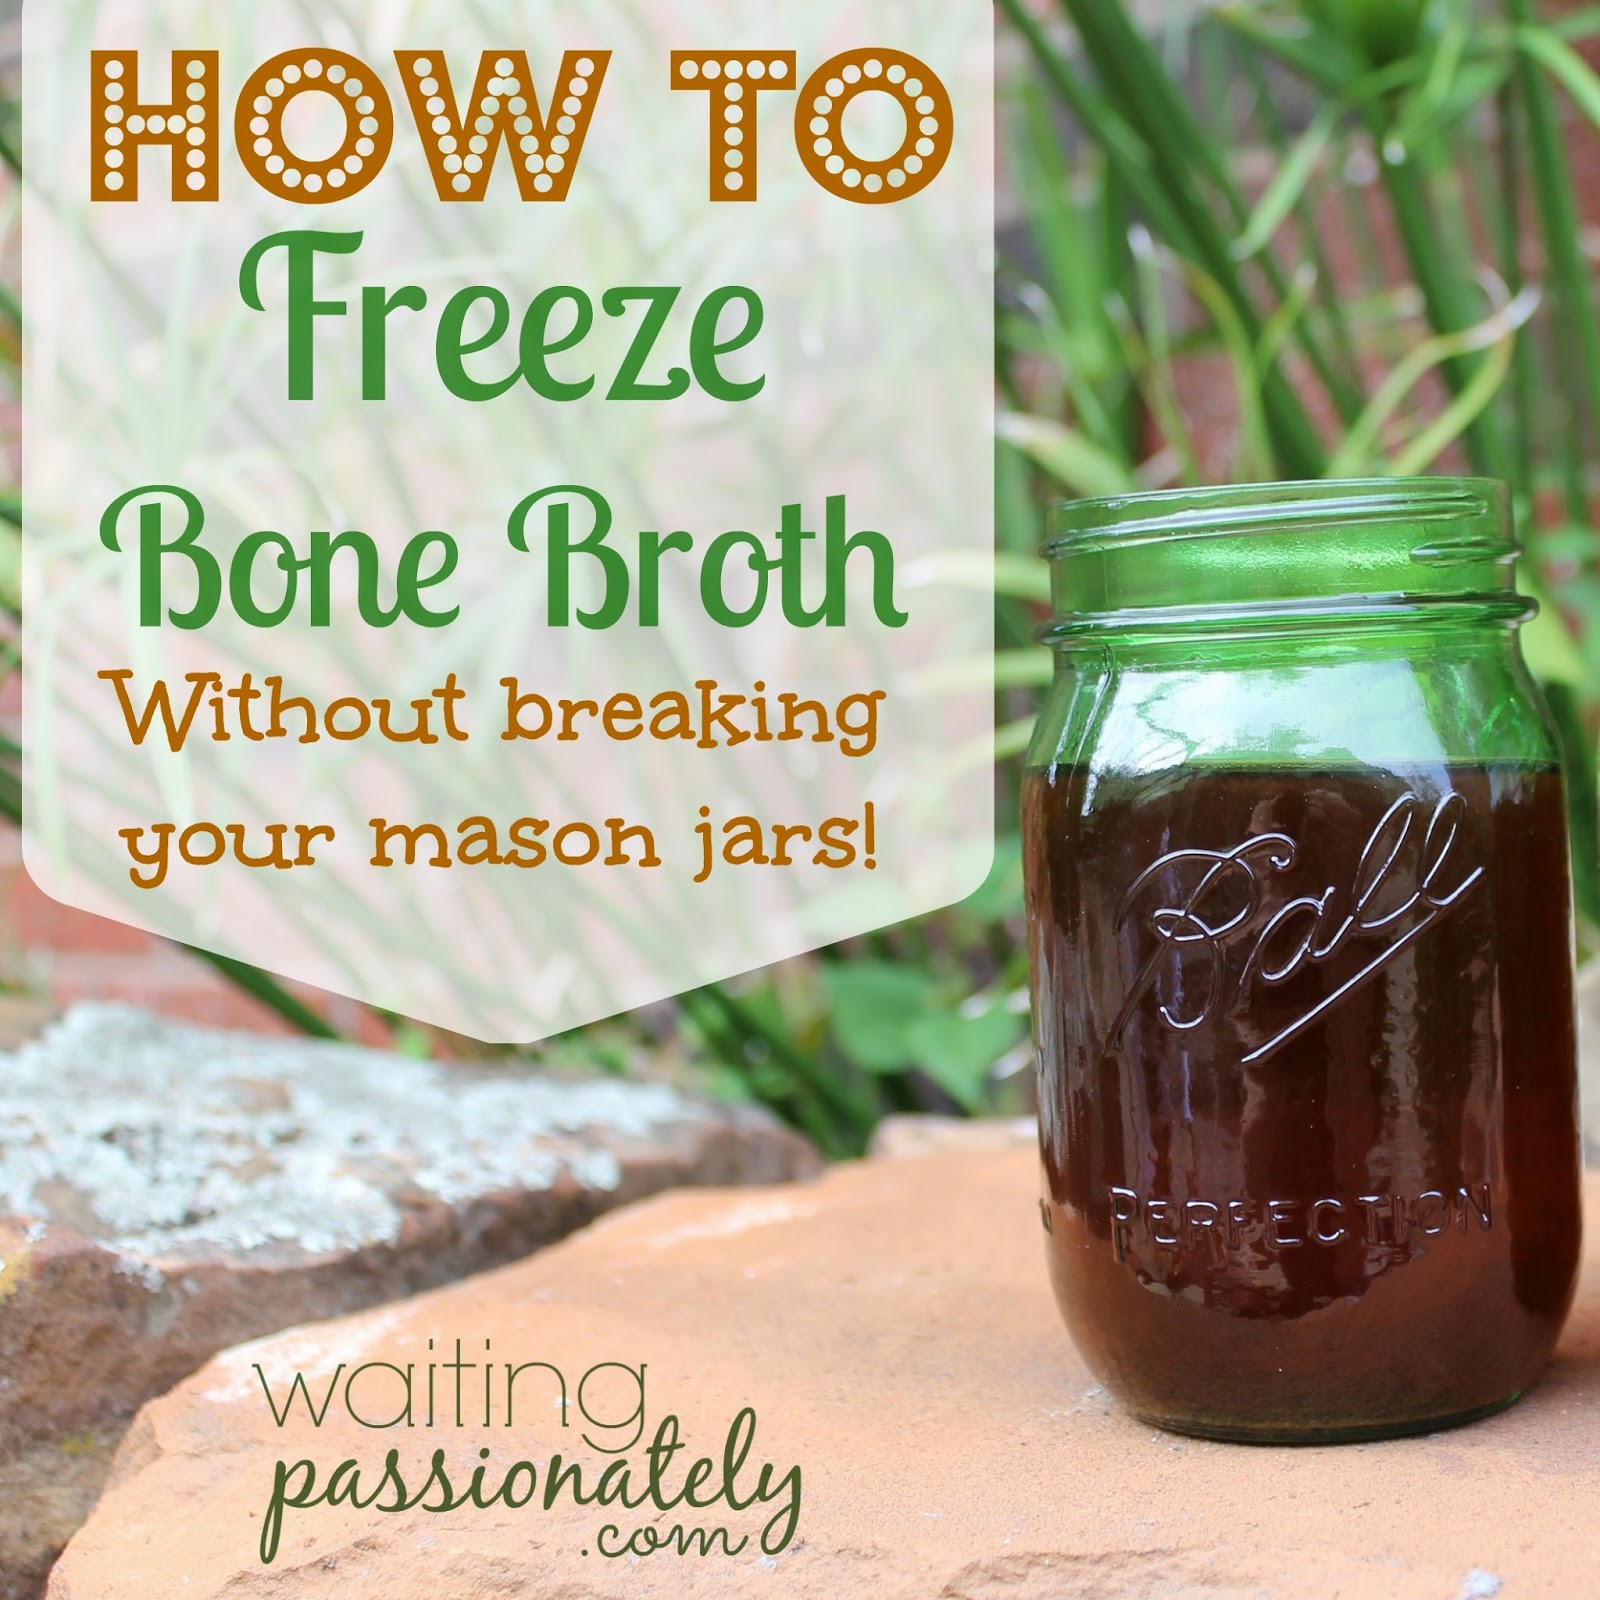
Once your broth is finished, carefully funnel it into mason jars. I used a ladle and a breast pump flange — ah, the glamorous life of a nursing mother. Leave at least an inch of headspace. I usually leave more to be on the safe side. Liquid expands as it freezes, so you need to allow some wiggle room. Do NOT put the lids on the jars (yet). Notice the photos are lid-free. Let the jars cool at room temperature for a couple of hours. You can also put them in the fridge if there’s enough room…without lids. Once the jars are no longer piping hot, place them in the freezer. Without lids. (It’s kind of important!)
 
Leave the opened jars of broth in the freezer for approximately 24 hours. This allows plenty of time for the liquid to freeze and expand. The extra headspace and lack of lid keep the jar from bursting. After everything is frozen solid, affix the lids. Lids are the last step.
 

All of these jars contain the same amount of broth. The fully frozen jar on the right shows how much expansion occurs during the freezing process. Not a huge amount, but definitely enough to crack your jars. The frozen broth (or soup or sauce) will last about six months.

This is the perfect way for me to enjoy a cup of bone broth when I start feeling a little under the weather. While I use some of it for cooking, my main purpose for making bone broth is to get me through cold and flu season. As soon as my throat gets scratchy, I grab one of the frozen jars and thaw it in warm water. Once it’s thawed, I heat it up, season with sea salt, and sip it like hot tea. Delicious!


Banana Bread: Gluten-Free & Protein-Packed!

In my early teaching days, one of my colleagues had a habit of stress-baking. At the time, I never understood how baking could alleviate stress — I just envisioned extra dishes and a big mess in my kitchen…which would lead to more stress. One morning, she brought a tray full of beautiful scones to school, and we all knew her stress-levels had to be through the roof. Unfortunately, we were right. Fortunately, BAKED GOODIES!!!

My sweet toddler had lots in store for me today. After I swept up a pile of glass (he wanted to load the dishwasher) and cleaned up a handful of less dangerous messes, I felt the urge to bake. Suddenly, I understood her plight. I scoured a handful of my favorite gluten-free blogs for a banana bread recipe — because the browning bananas on my counter were adding to my stress. I couldn’t find one exact recipe that fit the ingredients hanging around in my pantry, and I really wanted my stress-baking to involve hemp protein powder and chia seeds. You know, so I could enjoy guilt-free eating. I used Southern-In-Law’s banana bread recipe as my base, and tweaked and twerked (ok, not that last part) until I created something to fit my specific needs.

Ingredients:
3 browning bananas
2 eggs
3 tbsps. coconut oil
1 1/2 tsp of honey (or maple syrup, more if you want it sweeter)
1 tsp of vanilla
1 1/2 cups of gluten-free pastry flour
1/4 cup hemp protein powder
1/4 cup chia seeds
1 1/2 tsp baking powder
1/4 tsp baking soda
Pinch of pink Himalayan sea salt
1 1/2 cups chocolate chips
1/4 cup chopped almonds (pecans, walnuts, whatever)

Pre-heat your oven to 350 and grease two mini-cupcake pans (I spray them with coconut oil). In a large mixing bowl, smash bananas and add wet ingredients. Stir in dry ingredients, except chocolate chips and almonds, then mix with a hand-held electric mixer. (Feel free to lick the beaters if you don’t so much care about raw eggs.) Add the chocolate chips and almonds last, and stir those in by hand. The batter itself isn’t incredibly sweet (which fit my desires perfectly since I’m breaking up with sugar), but the chocolate chips make up for that. Add more honey if you want a sweeter treat.

Spray a spoon with coconut oil, then spoon the batter into the mini-cupcake pans. (Yields approximately 36 mini banana bread bites.)

Bake at 350 for 20 minutes, switching the pans from top to bottom racks halfway through. Let them cool just enough not to burn your fingers and mouth, then slather them in grass-fed butter. Enjoy!

Family Worship: Praise Him in the Puddles

This morning, my two year old son brought Romans 12:1 to the forefront of my mind; he reminded me to let everything be an act of worship. “And so, dear brothers and sisters, I plead with you to give your bodies to God because of all he has done for you. Let them be a living and holy sacrifice—the kind he will find acceptable. This is truly the way to worship him.” (NLT)

Yesterday, both boys spent the day with Nana and Papa while I made up some maternity leave for the military. I missed them terribly and wanted to make up for lost time on our lazy Saturday. Asher wanted to play outside, so I upped the ante and surprised him by turning on the stream as he stood in the dry bed. He jumped and splashed until he was soaked.


Then, I broke the “rules” and let him play in his sandbox after getting wet. His joy was contagious! I didn’t care about the muddy mess he made of his clothes; I didn’t chide him for his impulsivity. I just watched and cheered him on with each splash. As I witnessed him worshiping with his life, he inspired me to worship with mine. Every smile and every squeal made me more aware of God’s love. Yet in those sweet moments, I knew the amount of love and joy I felt for my own son paled in comparison to the joy God feels when I worship him with my whole being.


Days like these are so important. No schedule to keep, no obligations to meet — just messy fun. While Asher and I made new memories (and Keane napped), I thanked the Lord for allowing this precious time. Some days it seems the world is coming apart at the seams; it’s imperative to remember that my God is never caught by surprise. He is never unprepared. He makes all things new, creates beauty from ashes, and holds us close. As his children, our job is to fall into his arms. To let go. To live for him, by him, and through him.

Don’t worry about what anyone else thinks, just think about whatever is pure and lovely. Don’t focus on outside distractions, focus on grace, mercy, and peace. Sing silly Bible songs with a silly two-year-old. Take a bubble-bath and make bubble-beards at 10:30am. Eat “ice cream” for lunch. Unplug. Relax. Don’t worry about muddy shoes, messy clothes, or dirty footprints. Don’t worry at all…about anything.


May you jump in life’s proverbial puddles.
May you roll around in wet sand.
May you treat each waking breath as an act of worship.
May your Father revel in your unbridled praise.

DIY: Back to School Intro Photo

As a former teacher and a daughter of a kindergarten teacher, I know all too well how hectic those meet-the-teacher encounters can be. There’s one teacher, twenty-something students, two (or more) parents per student, and maybe even a few grandparents thrown in for good measure.

Give the teacher a helping hand by putting a face to a name! I created this cute little get to know me graphic in about five minutes using a recent photo and PicMonkey, a FREE photo editor. Be sure to include your child’s favorite things, food allergies or health alerts, and any other pertinent information.

My son isn’t quite ready for kindergarten, but he really enjoys his two-day-a-week Mother’s Day Out program. I emailed his intro photo to his teachers prior to meet-the-teacher night so they would be able to recognize him the first time he walks into their classroom. Even if your student is already back in school, I’m sure the teacher would appreciate a get to know me photo within the first month. I remember how crazy those early days can be!

Quick & Easy: Creamy Avocado Ranch Dip


Grab your favorite chips, a veggie platter, or (if you’re like my two-year-old) just a spoon! You’ll have this dip thrown together in no time.

Ingredients:
1 tablespoon of dry ranch seasoning
2 avocados
3 ounces of cream cheese

Directions:
Mash everything together in a bowl. That’s it! If you’re feeling fancy and don’t mind extra dishes to clean, throw it all in the food processor. I just use a fork, because it’s more socially acceptable to lick a fork than it is to lick a food processor. (And less chance of injury to my tongue, which I need to enjoy the dip.)

You really can’t go wrong with the measurements — add more avocados, more cream cheese, more ranch…or less, depending on your palate. It’s a nice alternative to guacamole, will wow a crowd, and won’t last long. Maybe you should just go ahead and double the recipe!

Why My Babies See a Chiropractor


When I tell people that my children (ages two years and three months) see a chiropractor on a weekly basis, I get a lot of strange looks and questions. The two most often-asked questions are “Why?” and “Won’t that hurt the baby?” Most people are familiar with accident and injury chiropractors who crack, pop, and align the spine with a firm hand, but they’ve never heard of a wellness chiropractor.

Wellness chiropractors operate from the mentality that our bodies have an innate ability to heal themselves. Your heart beats, your lungs breathe, and your nervous system runs the show — every body system relies on the central nervous system. That system cannot work properly if our bodies aren’t in alignment; wellness chiropractors use gentle manipulations to allow the body to function at an optimal level. Regular adjustments serve as preventative healthcare. Asher, my older son, was about twelve months old at his first chiropractic visit; Keane, my younger son, was six days old. The only reason Asher was so “old” at his first visit is because I didn’t know much about chiro-care for kids at that point.

When Asher began crawling, he would purposely and forcefully bang his head on the ground. This unnerving banging happened on a regular basis, and after several months the frontal plate of his skull shifted from the repeated impact. He still looked normal to everyone else, but my husband and I could see the slight difference. His pediatrician wrote it off as being normal for some babies, but in my gut I knew it wasn’t normal. As he neared one year old, he began exhibiting sensory-seeking behavior (in addition to the head-banging) consistent with sensory processing disorder, ADD, and/or ADHD (many of their symptoms overlap, and at such a young age it was too early to know for sure).

Several of my crunchy friends suggested taking him to see a chiropractor — I put it off for a few months because, like most people, I thought the adjustments would be hard on his little body. I finally gave in after these friends assured me it was all very gentle…watching him hit his head on the tile floor left me in tears on more than one occasion, and I was desperate for him to stop.

His first adjustment with Dr. Terry Garcia left me amazed! She was so gentle and sweet — I used more “force” getting him into and out of his car seat than she did with the adjustment. Even more amazing was that he quit banging his head with regular adjustments, and it didn’t take months to see results, it took weeks. I was hooked. Her knowledge of health and wellness astounded me (still does), and she made the suggestion to give up gluten to see if his other symptoms would improve. Since he was still nursing, I needed to cut it out of my diet as well. Seeing Asher’s overall improvement made me a believer: I, too, began to see her for weekly adjustments. As she suspected, the other symptoms improved and cleared up after gluten left our bodies. My general health shifted for the better as a result. When Keane was born, she came to our house to adjust him in his first week of life, and he has seen her every week since.

Chiropractic care has cleared up ear infections without the need for antibiotics, helped with sinus congestion, headaches, muscle aches, digestive issues, and promotes better sleep. Since seeing our chiropractor on a weekly basis, I haven’t been sick. At all. The minute my son gets congested or isn’t acting like his normal, happy self, we head to the chiropractor’s office. Both of my boys absolutely love our chiropractor, and Asher talks about going to see “Dotor Tehwey” all of the time.

If you’ve been considering a wellness chiropractor, please make an appointment. At worst, you go once and move on with your life. At best, you’ll find drastically improved health, fertility, vitality, and peace of mind!

EASY Gluten-Free Granola Bars

Snacking on quality granola bars can get expensive — especially when they’re the healthy kind. To borrow a line from Forrest Gump, “I could eat about a million and a half of these.” My two year old hijacked a piece of my delicious Kind Bar, then cried when I proceeded to finish my snack. There’s no way I can fund two of these addictions, so I grabbed the browning bananas out of the fruit bowl, a box of oatmeal, and the bag of chia seeds from the pantry.

I like Bakery on Main’s Maple Multigrain Muffin oatmeal because it’s gluten-free, non-GMO, and tasty! For those who can eat gluten without any problems, any brand of oatmeal will suffice. If you’re using PLAIN oatmeal, then you’ll want to add about half a cup of honey for sweetness. I used maple flavored, and it was plenty sweet. You can easily mix your favorite add-ins to this basic recipe (chocolate chips, coconut flakes, flax, hemp, a scoop of your favorite nut butter…), but we were coming off of a weekend chocolate chip cookie high, so I kept it basic.

To obtain a granola bar consistency, the trick is to spread the mixture fairly THIN in your baking pan (no more than half an inch thick), so stay away from small baking dishes for this recipe. One of my first attempts in a small baking dish led to a thicker outcome…but it tasted like oatmeal banana bread, so I didn’t consider it a failure! (In fact, I’ll purposely recreate that “mistake” in the fall so I can enjoy healthy banana bread.)

Amazing Avocado Deviled Eggs

Some things are too delicious to keep to myself. These excellent eggs are one of those things. Granted, if you were with me in my house right now, I might be tempted to lie and say this recipe didn’t turn out well…then try to hide them in the fridge so I could inhale them the minute you left. (Note to self: pray about self control.)

What you need:
– 8 hard boiled eggs (I put my eggs in a muffin tin, bake at 325 for 30 minutes, they’re perfect!)
– 1 medium ripe avocado (or two small ones)
– 1 tbsp prepared mustard (more if you prefer)

– 1 heaping tbsp mayonaise
– sea salt & ground pepper to taste (I like to sprinkle pink Himilayan sea salt over the finished product, instead of paprika.)

With a fork, mash the avocado and egg yolks together in a bowl. Add additional ingredients and stir well. Use a spoon (and your fingers, so you can lick them) to put the mixture in the hard boiled eggs. Garnish with sea salt or paprika. 

Great for a snack, a potluck, or whenever you’re feeling a little Seussical! Remember that avocados turn brown when exposed to air, so keep your deviled eggs in a closed container. If you make them a day in advance for a dinner party, you’ll probably have brown deviled eggs by the next evening. Although, I’ve never had mine last that long!

The Simple Sweet Sound of Silence

My mind, my mouth, and mobile devices were rarely silent, until very recently. After reading Southern In-Law’s latest Sisters in Christ blogvotional, my heart is stirred for silence.

There are times throughout Scripture when believers were instructed not to be silent. Esther’s silence would have meant the destruction of her family. In Luke 19, Jesus said the stones would cry out in praise if his disciples kept quiet. Christians are called to loudly stand up for injustices and praise His name, yet in other instances closed lips are the key to godly wisdom.

Psalm 4:4 (NIV) speaks of silence. “Tremble and do not sin; when you are on your beds, search your heart and be silent.” The New Living Translation puts it this way: “Don’t sin by letting anger control you. Think about it overnight and remain silent.” I have my father to thank for my quick wit and gift of sarcasm; it’s in my DNA. For the most part, these characteristics serve me well and I truly love to make people laugh. However, sarcasm, quick wit, and anger are a recipe for disaster. I have an unfortunate ability to wound with my words. My husband, Mark, knows this all too well.

Rather than fighting back with a sharp tongue and wounding my husband’s spirit, I need to meditate in silence. When my words aren’t exactly dripping with honey, they need to stay in my mouth. If I’m not prepared to encourage or edify, I need to keep quiet. Or unload the dishwasher. Or take a walk. Or bake a cake. Then I could fill my mouth with delicious gluten-free cake instead of venomous words.

Psalm 12:3 (NIV) reminds me that silence squashes selfishness. “May the Lord silence all flattering lips and every boastful tongue…” The Contemporary English Version is a bit more graphic, “Won’t you chop off all flattering tongues that brag so loudly?” Turns out that my tongue needed a bit of chopping. Social media became an avenue for me to brag and engage in unproductive flattery. It’s difficult to hold our tongues about how wonderful our children are; we need to be proud of them and brag on them! But for me, the issue isn’t just about taking pride in my children, it’s about the condition of my heart. What am I really saying with every see-how-awesome-my-kid-is status update?

 
Sometimes it takes great restraint to close my mouth in the midst of anger and hurt feelings. It’s so much easier to tell my husband exactly how I think he has wronged me, how his words and actions make me feel, and what I want him to do about it. In these instances, the hard thing is the right thing. My anger is mine, no one else’s. When I begin to feel frustrated or overwhelmed, I need to quietly reflect until I’m able to have a peaceful, productive conversation.
 
When I feel the stinging loneliness of motherhood, I don’t need to post a litany of mommy-accomplishments or veiled attempts to fish for compliments. I can meditate on scripture, pick up the phone and call my mother, have an impromptu dance party with Asher, or write a blog. The words of my mouth and meditations of my heart are often far from where they should be, but resting in silence allows me to regroup and recover instead of doing damage control.

How I Tricked my Toddler into Listening

Life with a toddler brings laughter, silliness, adorable memories…and frustration. Listening is difficult even on the good days — their independent spirits are blooming, and stubbornness is in full force. If sharing my latest Hail Mary parenting pass helps at least one frazzled toddler-parent, then the struggle has been worth it!

In my extensive, highly scientific research in the field of toddlers, I have come to the following conclusion: They be cray-cray. Adorable, but certifiably crazy.

If adults acted like toddlers…

Any adult who actually did those things on a regular basis would be under psychiatric evaluation in no time. (Full disclosure: I may have witnessed my adult brother do a few of these things.) Toddlerhood is a beautiful blend of bipolar disorder and schizophrenia. They’re happy and energetic one minute, then sad (and still energetic) the next. They must hear voices, because Mommy and Daddy sure didn’t say anything about eating suckers for breakfast. Or waking up at 6:30am. Every morning.

After one particularly rough morning (during my week without Facebook), I reached the end of my rope. Asher doesn’t respond to counting, or conversations, or threats, or spankings, or time-outs. I knew he needed some sort of visual aid to help him out when he went rogue. In my desperation, I turned to a paper plate. In less than five minutes, Mr. Listening Ears was born. He has my ears.

I explained to Asher that when he made good choices, listened, and obeyed, that Mr. Listening Ears would be happy. But when he made bad choices and didn’t listen to Mommy and Daddy, Mr. Listening Ears would be sad. When I introduced our new friend, I had Asher touch Mr. Listening Ear’s orange paper ears, and we talked about using our listening ears. Then he touched his own ears to solidify the concept.

He hangs out up high on the refrigerator — away from toddler hands and constantly visible. When Asher starts to exhibit a wee bit of craziness, I remind him that Mr. Listening Ears is currently happy, and we wouldn’t want to make him sad by making bad choices. Sometimes it thwarts a tantrum, sometimes it doesn’t.

On the occasion that the smile turns to a frown, Asher goes nuts. He definitely does not like seeing the sad face. He’ll fuss and cry, saying, “Mommy, make Mistew Wistening Eaws happy!” To which I reply, “Only Asher can make him happy with good choices.” Sometimes he continues on to full-on-meltdown-mode, and other times he course-corrects to earn back the happy face. We’ve had more successes than failures with this new method, which is promising.

So, my toddler won’t necessarily listen to me, but he will listen to a paper plate. I’m calling it a win.